|
|
|
Building Your First App With Android Stdio
Set Up Your Environment Before you start this class, be sure you have your development environment set up. You need to:
- Download Android Studio.
- Download the latest SDK tools and platforms using the SDK Manager.
Creating an Android Project
|
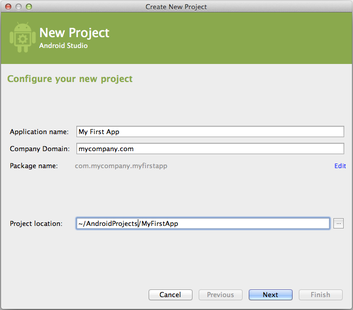
1-In Android Studio, create a new project:
If you don't have a project opened, in the Welcome screen, click New Project. If you have a project opened, from the File menu, select New Project. 2-Under Configure your new project, fill in the fields as shown in figure 1 and click Next.It will probably be easier to follow these lessons if you use the same values as shown. Application Name is the app name that appears to users. For this project, use "My First App." Company domain provides a qualifier that will be appended to the package name; Android Studio will remember this qualifier for each new project you create. Package name is the fully qualified name for the project (following the same rules as those for naming packages in the Java programming language). Your package name must be unique across all packages installed on the Android system. You can Edit this value independently from the application name or the company domain. Project location is the directory on your system that holds the project files. 3-Under Select the form factors your app will run on, check the box for Phone and Tablet. |
4-For Minimum SDK, select API 8: Android 2.2 (Froyo).The Minimum Required SDK is the earliest version of Android that your app supports, indicated using the API level. To support as many devices as possible, you should set this to the lowest version available that allows your app to provide its core feature set. If any feature of your app is possible only on newer versions of Android and it's not critical to the app's core feature set, you can enable the feature only when running on the versions that support it (as discussed in Supporting Different Platform Versions).
5-Leave all of the other options (TV, Wear, and Glass) unchecked and click Next. |
6-Under Add an activity to <template>, select Blank Activity and click Next.
7-Under Choose options for your new file, change the Activity Name to MyActivity. The Layout Name changes to activity_my, and the Title to MyActivity. The Menu Resource Name ismenu_my.
8-Click the Finish button to create the project.
Your Android project is now a basic "Hello World" app that contains some default files. Take a moment to review the most important of these:
app/src/main/res/layout/activity_my.xml
This is the XML layout file for the activity you added when you created the project with Android Studio. Following the New Project workflow, Android Studio presents this file with both a text view and a preview of the screen UI. The file includes some default settings and a TextView element that displays the message, "Hello world!"
app/src/main/java/com.mycompany.myfirstapp/MyActivity.java
A tab for this file appears in Android Studio when the New Project workflow finishes. When you select the file you see the class definition for the activity you created. When you build and run the app, the Activityclass starts the activity and loads the layout file that says "Hello World!"
app/src/main/AndroidManifest.xmlThe manifest
file describes the fundamental characteristics of the app and defines each of its components. You'll revisit this file as you follow these lessons and add more components to your app.
app/build.gradle
Android Studio uses Gradle to compile and build your app. There is a build.gradle file for each module of your project, as well as a build.gradle file for the entire project. Usually, you're only interested in thebuild.gradle file for the module, in this case the app or application module. This is where your app's build dependencies are set, including the defaultConfig settings:
Note also the /res subdirectories that contain the resources for your application:
drawable<density>/Directories for drawable objects (such as bitmaps) that are designed for various densities, such as medium-density (mdpi) and high-density (hdpi) screens. Other drawable directories contain assets designed for other screen densities. Here you'll find the ic_launcher.png that appears when you run the default app.layout/Directory for files that define your app's user interface like activity_my.xml, discussed above, which describes a basic layout for the MyActivity class.menu/Directory for files that define your app's menu items.values/Directory for other XML files that contain a collection of resources, such as string and color definitions. The strings.xml file defines the "Hello world!" string that displays when you run the default app.
7-Under Choose options for your new file, change the Activity Name to MyActivity. The Layout Name changes to activity_my, and the Title to MyActivity. The Menu Resource Name ismenu_my.
8-Click the Finish button to create the project.
Your Android project is now a basic "Hello World" app that contains some default files. Take a moment to review the most important of these:
app/src/main/res/layout/activity_my.xml
This is the XML layout file for the activity you added when you created the project with Android Studio. Following the New Project workflow, Android Studio presents this file with both a text view and a preview of the screen UI. The file includes some default settings and a TextView element that displays the message, "Hello world!"
app/src/main/java/com.mycompany.myfirstapp/MyActivity.java
A tab for this file appears in Android Studio when the New Project workflow finishes. When you select the file you see the class definition for the activity you created. When you build and run the app, the Activityclass starts the activity and loads the layout file that says "Hello World!"
app/src/main/AndroidManifest.xmlThe manifest
file describes the fundamental characteristics of the app and defines each of its components. You'll revisit this file as you follow these lessons and add more components to your app.
app/build.gradle
Android Studio uses Gradle to compile and build your app. There is a build.gradle file for each module of your project, as well as a build.gradle file for the entire project. Usually, you're only interested in thebuild.gradle file for the module, in this case the app or application module. This is where your app's build dependencies are set, including the defaultConfig settings:
- compiled Sdk Version is the platform version against which you will compile your app. By default, this is set to the latest version of Android available in your SDK. (It should be Android 4.1 or greater; if you don't have such a version available, you must install one using the SDK Manager.) You can still build your app to support older versions, but setting this to the latest version allows you to enable new features and optimize your app for a great user experience on the latest devices.
- applicationId is the fully qualified package name for your application that you specified during the New Project workflow.
- minSdkVersion is the Minimum SDK version you specified during the New Project workflow. This is the earliest version of the Android SDK that your app supports.
- targetSdkVersion indicates the highest version of Android with which you have tested your application. As new versions of Android become available, you should test your app on the new version and update this value to match the latest API level and thereby take advantage of new platform features. For more information, read Supporting Different Platform Versions.
Note also the /res subdirectories that contain the resources for your application:
drawable<density>/Directories for drawable objects (such as bitmaps) that are designed for various densities, such as medium-density (mdpi) and high-density (hdpi) screens. Other drawable directories contain assets designed for other screen densities. Here you'll find the ic_launcher.png that appears when you run the default app.layout/Directory for files that define your app's user interface like activity_my.xml, discussed above, which describes a basic layout for the MyActivity class.menu/Directory for files that define your app's menu items.values/Directory for other XML files that contain a collection of resources, such as string and color definitions. The strings.xml file defines the "Hello world!" string that displays when you run the default app.
Running Your App
Run on a Real DeviceIf you have a device running Android, here's how to install and run your app.
Set up your device
1-Plug in your device to your development machine with a USB cable. If you're developing on Windows, you might need to install the appropriate USB driver for your device. For help installing drivers, see the OEM USB Drivers document.
2-Enable USB debugging on your device.
* On most devices running Android 3.2 or older, you can find the option under Settings > Applications > Development.
*On Android 4.0 and newer, it's in Settings > Developer options.Note: On Android 4.2 and newer, Developer options is hidden by default. To make it available, go toSettings > About phone and tap Build number seven times. Return to the previous screen to findDeveloper options.
Run the app from Android Studio
Android Studio installs the app on your connected device and starts it.
Set up your device
1-Plug in your device to your development machine with a USB cable. If you're developing on Windows, you might need to install the appropriate USB driver for your device. For help installing drivers, see the OEM USB Drivers document.
2-Enable USB debugging on your device.
* On most devices running Android 3.2 or older, you can find the option under Settings > Applications > Development.
*On Android 4.0 and newer, it's in Settings > Developer options.Note: On Android 4.2 and newer, Developer options is hidden by default. To make it available, go toSettings > About phone and tap Build number seven times. Return to the previous screen to findDeveloper options.
Run the app from Android Studio
- Select one of your project's files and click Run from the toolbar.
- In the Choose Device window that appears, select the Choose a running device radio button, select your device, and click OK .
Android Studio installs the app on your connected device and starts it.
Building a Simple User Interface
In this lesson, you create a layout in XML that includes a text field and a button. In the next lesson, your app responds when the button is pressed by sending the content of the text field to another activity.
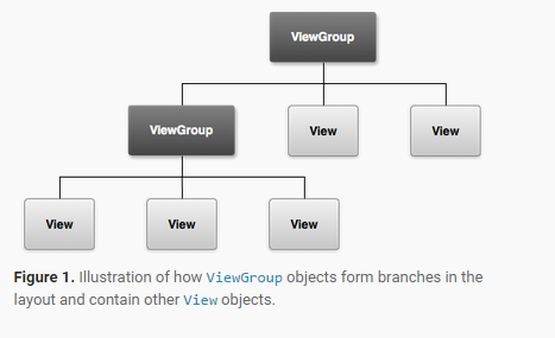
The graphical user interface for an Android app is built using a hierarchy of View and ViewGroup objects. View objects are usually UI widgets such as buttons or text fields. ViewGroupobjects are invisible view containers that define how the child views are laid out, such as in a grid or a vertical list.
Android provides an XML vocabulary that corresponds to the subclasses of View and ViewGroup so you can define your UI in XML using a hierarchy of UI elements.
Layouts are subclasses of the ViewGroup. In this exercise, you'll work with a LinearLayout.
|

|
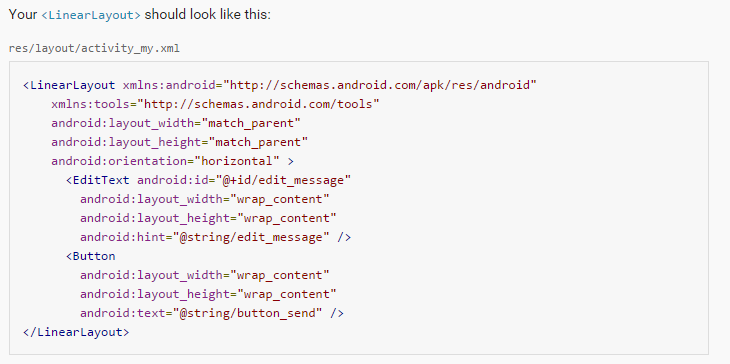
Create a Linear Layout
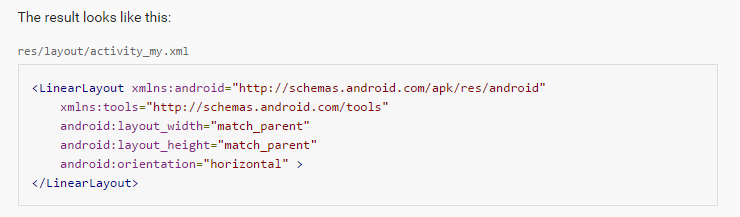
- In Android Studio, from the res/layout directory, open the activity_my.xml file.The BlankActivity template you chose when you created this project includes the activity_my.xml file with aRelativeLayout root view and a TextView child view.
- In the Preview pane, click the Hide icon to close the Preview pane.In Android Studio, when you open a layout file, you’re first shown the Preview pane. Clicking elements in this pane opens the WYSIWYG tools in the Design pane. For this lesson, you’re going to work directly with the XML.
- Delete the <TextView> element.
- Change the <RelativeLayout> element to <LinearLayout>.
- Add the android:orientation attribute and set it to "horizontal".
- Remove the android:padding attributes and the tools:context attribute
NOTE:android:layout_width and android:layout_height Instead of using specific sizes for the width and height, the"wrap_content" value specifies that the view should be only as big as needed to fit the contents of the view. If you were to instead use "match_parent", then the EditText element would fill the screen, because it would match the size of the parent LinearLayout. For more information, see the Layouts guide.
Add a Text Field
As with every View object, you must define certain XML attributes to specify the EditText object's properties.
res/layout/activity_my.xml
- In the activity_my.xml file, within the <LinearLayout> element, define an <EditText> element with the idattribute set to @+id/edit_message.
- Define the layout_width and layout_height attributes as wrap_content.
- Define a hint attribute as a string object named edit_message.
res/layout/activity_my.xml

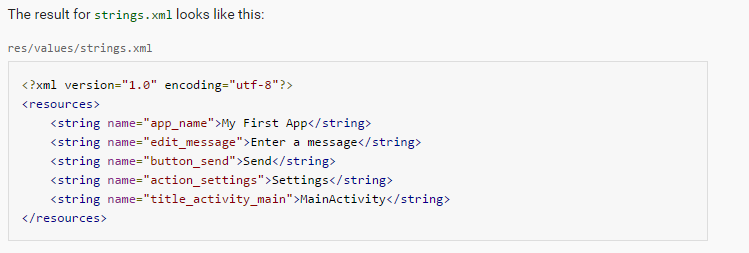
Add String Resources
By default, your Android project includes a string resource file at res/values/strings.xml. Here, you'll add a new string named "edit_message" and set the value to "Enter a message."
- In Android Studio, from the res/values directory, open strings.xml.
- Add a line for a string named "edit_message" with the value, "Enter a message".
- Add a line for a string named "button_send" with the value, "Send".You'll create the button that uses this string in the next section.
- Remove the line for the "hello world" string.
Add a Button
- In Android Studio, from the res/layout directory, edit the activity_my.xml file.
- Within the <LinearLayout> element, define a <Button> element immediately following the <EditText>element.
- Set the button's width and height attributes to "wrap_content" so the button is only as big as necessary to fit the button's text label.
- Define the button's text label with the android:text attribute; set its value to the button_send string resource you defined in the previous section.
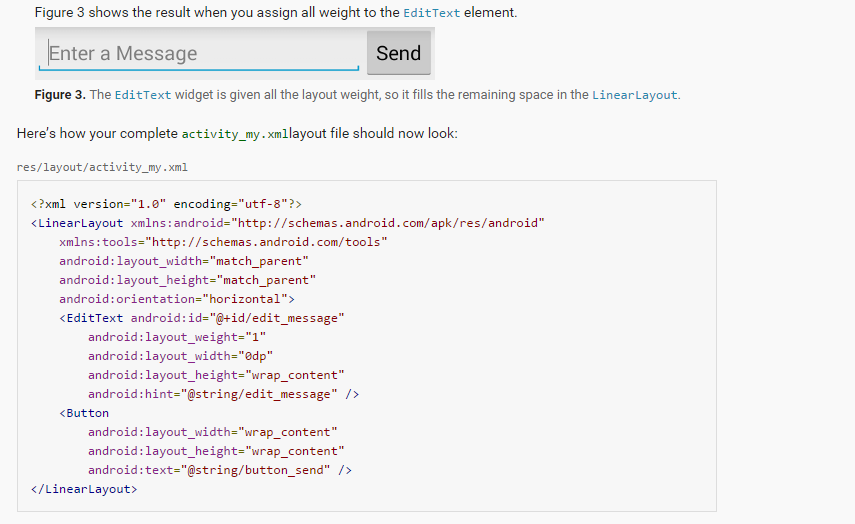
Make the Input Box Fill in the Screen Width
To fill the remaining space in your layout with the EditText element, do the following:
- In the activity_my.xml file, assign the <EditText> element's layout_weight attribute a value of 1.
- Also, assign <EditText> element's layout_width attribute a value of 0dp.res/layout/activity_my.xml

Run Your App
This layout is applied by the default Activity class that the SDK tools generated when you created the project. Run the app to see the results:
This layout is applied by the default Activity class that the SDK tools generated when you created the project. Run the app to see the results:
- In Android Studio, from the toolbar, click Run .
